I’ve managed to install NetBSD 9.3 on a Pismo 400 MHz. Let save the procedure here.

I used several tutos, each of much help, but each not fitting completely with my configuration, so had to use a mix of all these commands.
Here the links :
Cameron Kaiser’s install on a MacMini G4.
Another MacMini G4 install.
The obligatory online Installation procedure for NetBSD/macppc 9.3.


- Now we need to format our root partition to something NetBSD can read, that is ffs. So do :
newfs /dev/wd0a
And let it do his things (note wd0a, it can also be typed rwd0a, « a » is for the partition labeled as root). - Next we need to mount that root partition, and write a fstab file for it and the swap partition. First mount it like so :
mount /dev/wd0a /mnt
then create a etc folder at the root of the partition :
mkdir /mnt/etc
Then create the fstab file into that folder using the included ed text editor which works a bit like vi. like so :
ed /mnt/etc/fstab
a
/dev/wd0a / ffs rw 1 1
/dev/wd0b none swap sw 0 0
.
wq
Note at one point, ed will say « /mnt/etc/fstab: No such file or directory », no worries, the file is indeed not there but it’s creating it.
« a » then enter is for entering edit mode in ed. Next two lines are the actual content of the fstab file. « . » then enter is to quit edit mode.
And wq then enter is to save file and quit ed.
You can verify your work by typing :
cat /mnt/etc/fstab
And it should show you the content of the created fstab file in etc.
Then unmount the root partition, like so :
umount /mnt - Next we go into the installation utility, by typing :
sysinst
Before installing anything we need to make a small change to how the root partition will be mounted, for that go to « e: Utility menu » :
Then to « d: Partition a disk » :
Select « b: wd0a (4.2BSD) » and hit enter :
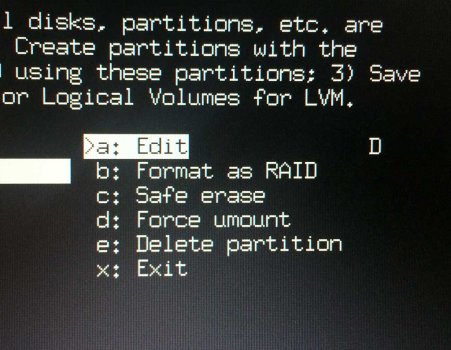
Then « a : Edit » :
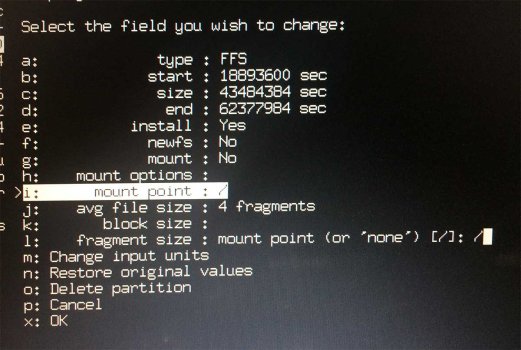
Check that the mount point is really at / . For some reasons it may be at /mnt, Sysinst taking into account that we mounted wd0a root partition there when we created the fstab file. If it is so, navigate to « i : Mount point : /mnt » then hit enter and type « / » (without quotes) and enter. should look like so :
Then go back to Sysinst first menu by going to « x: Ok » and enter.
And choose « a: Install NetBSD to hard disk » and enter :
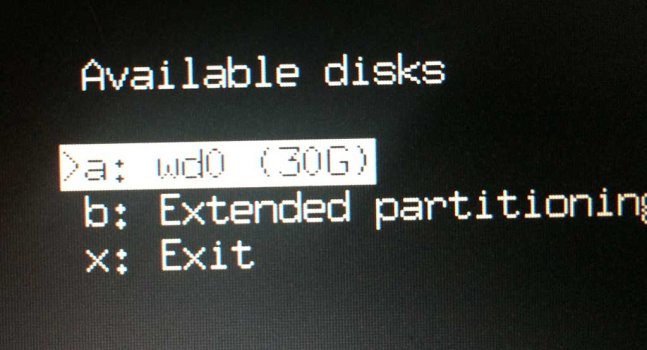
Choose « a: wd0 (30G) » and enter :
Then « a: Use existing disklabel partitions » :
Then navigate down to « x: Partition sizes ok » and hit enter :
At the next screen, choose full installation « a: Full installation ».
Then « a: CD-ROM / DVD » .
And let the installer do his things. Once it is finished, hit enter to continue, and you’re in the Sysinst menu to set up your system, which is really easy to follow. There you can set the time, your host name, set up the root passwd, create a user, start a number of services like sshd or ntpd …etc.
Also set up the network BEFORE installing Pkgin and Pkgsrc package managers. I had trouble installing these before setting network.
For this, have your router address handy and choose an available local IP address for the machine as only static address will do, for now no dhcp.
Also when asked to choose a DNS server, choose a default Google one (8.8.8.8) as when I tried with my provider’s DNS server, it couldn't find NetBSD mirrors for installing Pkgin and Pkgsrc. It can be changed after install anyway.
Now install Pkgin and Pkgsrc package managers. When all this is done, navigate back to Sysinst first menu and choose « d: Reboot the computer » and enter. - Still here ? And no, it won’t boot into NetBSD yet. If you have already installed MacOS9 on the HFS+ partition, it will boot into it.
If not, the Mac will see no operating system, and you’ll have a blank screen with a Ø in the middle. No panic.
To boot NetBSD, you need to boot in Open Firmware, and OF can only read the NetBSD booter « ofwboot.xcf » and kernel « netbsd-GENERIC.gz » from the HFS+ partition. These are on the NetBSD 9.3 CD rom we’ve been using to do the install. So we need to put it there on that HFS+ partition.
For that we have two options :
- If you have another Mac and Firewire cable handy, connect the two via Firewire and boot the Pismo in target mode (holding t key) and copy the « ofwboot » and « ofwboot.xcf » booter files, and the kernel which is at /macppc/binary/kernel/netbsd-GENERIC.gz, from the NetBSD CD in the other Mac to the root of the Pismo’s hard drive. Note Cameron Kaiser says in his howto it can be helpful to put a decompressed copy of the « netbsd-GENERIC.gz » kernel there too… So I did.
- Or, boot the Pismo on a MacOS9 installer CD, install OS9 (no formating or installing drivers please). Once done, reboot in MacOS9, insert the NetBSD 9.3 installer CD and copy the « ofwboot » and « ofwboot.xcf » booter files, and the kernel which is at /macppc/binary/kernel/netbsd-GENERIC.gz, to the root of the hard drive. - Everything should be Ok to boot the Pismo on the installed NetBSD now. For that reboot in Open firmware,then type :
boot hd:,\ofwboot.xcf hd:10/netbsd
After a dozen of lines, it should again ask « boot », just type :
netbsd
And enjoy.


If the xdm logging manager as not been set up to start at boot during the installation, then « startx » will start Ctwm minimalistic default wm. But there many other you can install.
if we go into antiquity, you can install a full CDE desktop following instructions here :
http://45.76.81.249/NetBSD/macppc/
Which is what I did :

http://cdn.netbsd.org/pub/pkgsrc/packages/NetBSD/macppc/9.3/All/
Even Arcticfox is there, but beware, it was too much for my Pismo to run. Only managed once to use it (slow), and next try it crashed the computer.
Rebooting, the disk showed some errors at system checks, and I had to run fsck_ffs -y /dev/wd0a twice to save the system…
Anyway, a Pismo is not really ideal to run a heavy browser and surf the web, and Netsurf or Lynx are there too.
Sound worked out of the box, I could use cmus to listen to radio streams. Audacious installs fine too, but thrown errors when trying to read streams tho...
I've not tried Wifi cause this Pismo is a bit of a hybrid with a lombard screen, so can't install the airport card internally. Will see how it works with an PC Card maybe.
Since this install, NetBSD 10 is out, I also tried it but after booting the CD, I get a black screen :/ seems consistent with some infos on the NetBSD MacPPC doc that some versions would need the install to be done via serial console, which I’m not ready to try yet… But why does that happen with a new version ? Mystery.
I also did an install on a 500MHz Titanium, install went fine, but the video is all borked up half way into booting from the HD. So for now, I’m playing with the Pismo.


No comments:
Post a Comment